
Old prints fade, crack and pick up stains, and restoring one by hand used to take hours with healing brushes and clone stamps. AI photo restoration now does most of that work in a single pass, but the result still depends on two things you control: how well you digitize the original, and how carefully you judge what the AI gives back.
This guide covers the full workflow to restore old photos with AI: scanning, repairing and colorizing, upscaling for print, finishing by hand, and keeping the result honest.
What AI restoration can and can't do
A good restoration model looks at the whole picture at once. It can:
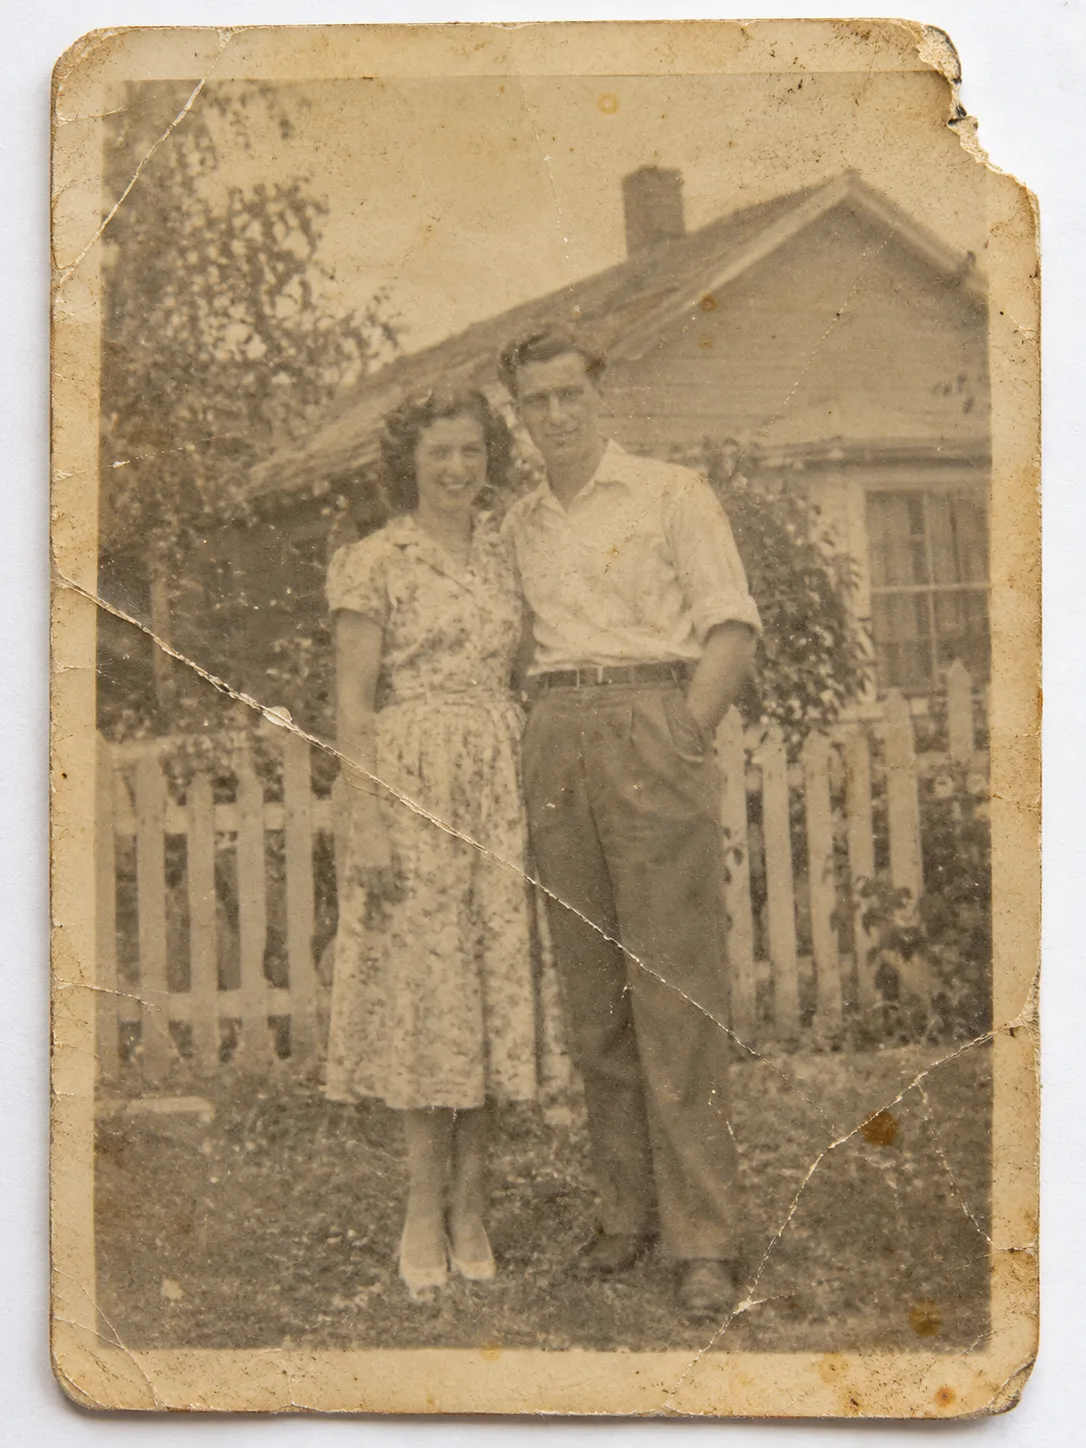
- remove scratches, dust, creases, tears and stains,
- recover faded contrast, with deeper shadows and cleaner highlights,
- gently sharpen faces and fine details,
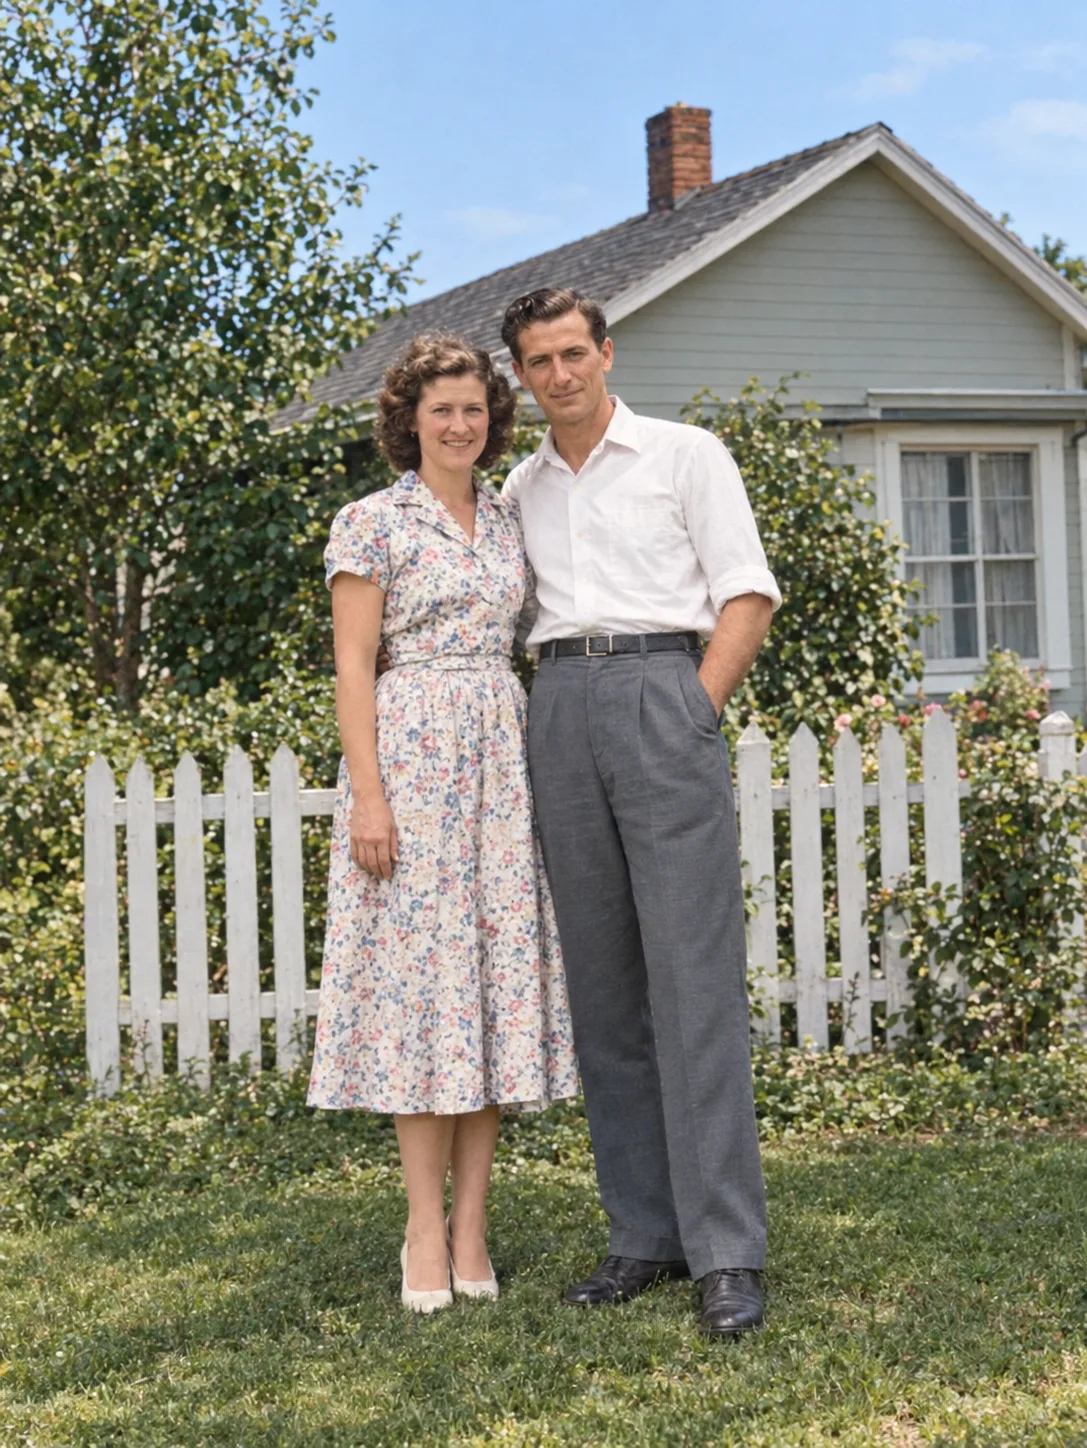
- add natural, period-appropriate color, or keep the original black-and-white or sepia tone.
What it can't do is recover information that is truly gone. When part of a face is torn away, the model fills it with something plausible, not with what was actually there, and colors added to a black-and-white photo are an estimate.
Step 1: Scan or photograph the print properly
- Handle prints gently. Hold them by the edges with clean, dry hands. If a photo is stuck to an album page, don't force it off; scan it in place.
- Clean the glass, not the photo. Wipe the scanner glass with a dry microfiber cloth and brush loose dust off the print. Never use water or sprays on the photo.
- Scan at a high resolution. 600 dpi is a good default for standard prints; scan very small prints higher so the file still has enough pixels.
- Scan in color, even for black-and-white photos. A color scan keeps the paper tone, and you can always convert to monochrome later.
- Keep a master file. Save the untouched scan as a lossless TIFF or PNG and store it safely. Everything else is a copy.
- No scanner? Use your phone carefully. Shoot in soft daylight without flash, hold the phone parallel to the print so it doesn't come out as a trapezoid, and crop to the edge of the photo. If a glossy print reflects, move the light rather than tilting the phone.
- Prepare an upload copy. The AI tools accept JPG, PNG or WebP files up to 10 MB, so export a copy if your master is a large TIFF.
Step 2: Restore the photo with AI
- Upload the copy. Open the AI photo restoration tool and upload your scan.
- Choose a mode. Restore + colorize repairs the damage and adds natural color. Restore, keep B&W repairs it while keeping the original black-and-white or sepia tone.
- Add what you know. The optional notes field matters. If you know a dress was dark blue or a car was red, write it down and the AI takes it into account.
- Generate and compare. Drag the slider to compare with the original. Look closely at faces, hands, eyes and lettering, where a model is most likely to drift.
- Run it again if needed. Each run gives a slightly different result, and you can switch between the available models. Every run uses credits; the cost is shown before you start, and failed runs are refunded automatically.
- Download the version you like. Results are also saved in My Creations.
Restore only, or restore and colorize?
Keep the photo black and white when it belongs to a family archive, when the original tone is part of its character, or when you want the repair without any interpretation. Colorize when you want to share a portrait that feels closer to life. Many people do both: a repaired monochrome version for the archive and a colorized one to share.
Not every old photo needs a full restoration
A faded color print from the 1980s or 1990s often has no scratches at all, just a color cast and weak contrast. For those, the AI photo enhancer is usually the better fit: it corrects exposure and white balance, recovers shadows and highlights, and leaves the content alone.
 BeforeAfter
Step 3: Upscale the restored photo for print
A restored file may still be too small to print large. Run it through the AI image upscaler, which enlarges the image while rebuilding edges and textures instead of stretching pixels. It picks the enlargement automatically, so check the pixel size of the download.
As a rough guide, printing at 300 pixels per inch means a 6 × 4 inch print needs about 1800 × 1200 pixels. Restore first and upscale second for the cleanest result. Heavy motion blur or an out-of-focus subject can't be fully recovered by any tool.
Step 4: Finish by hand in the free editor
AI gets you most of the way. The last few percent is best done by eye in the free online photo editor, which runs in your browser and keeps your files on your device.
- Crop and straighten. Level the horizon or a door frame, then crop away any leftover border.
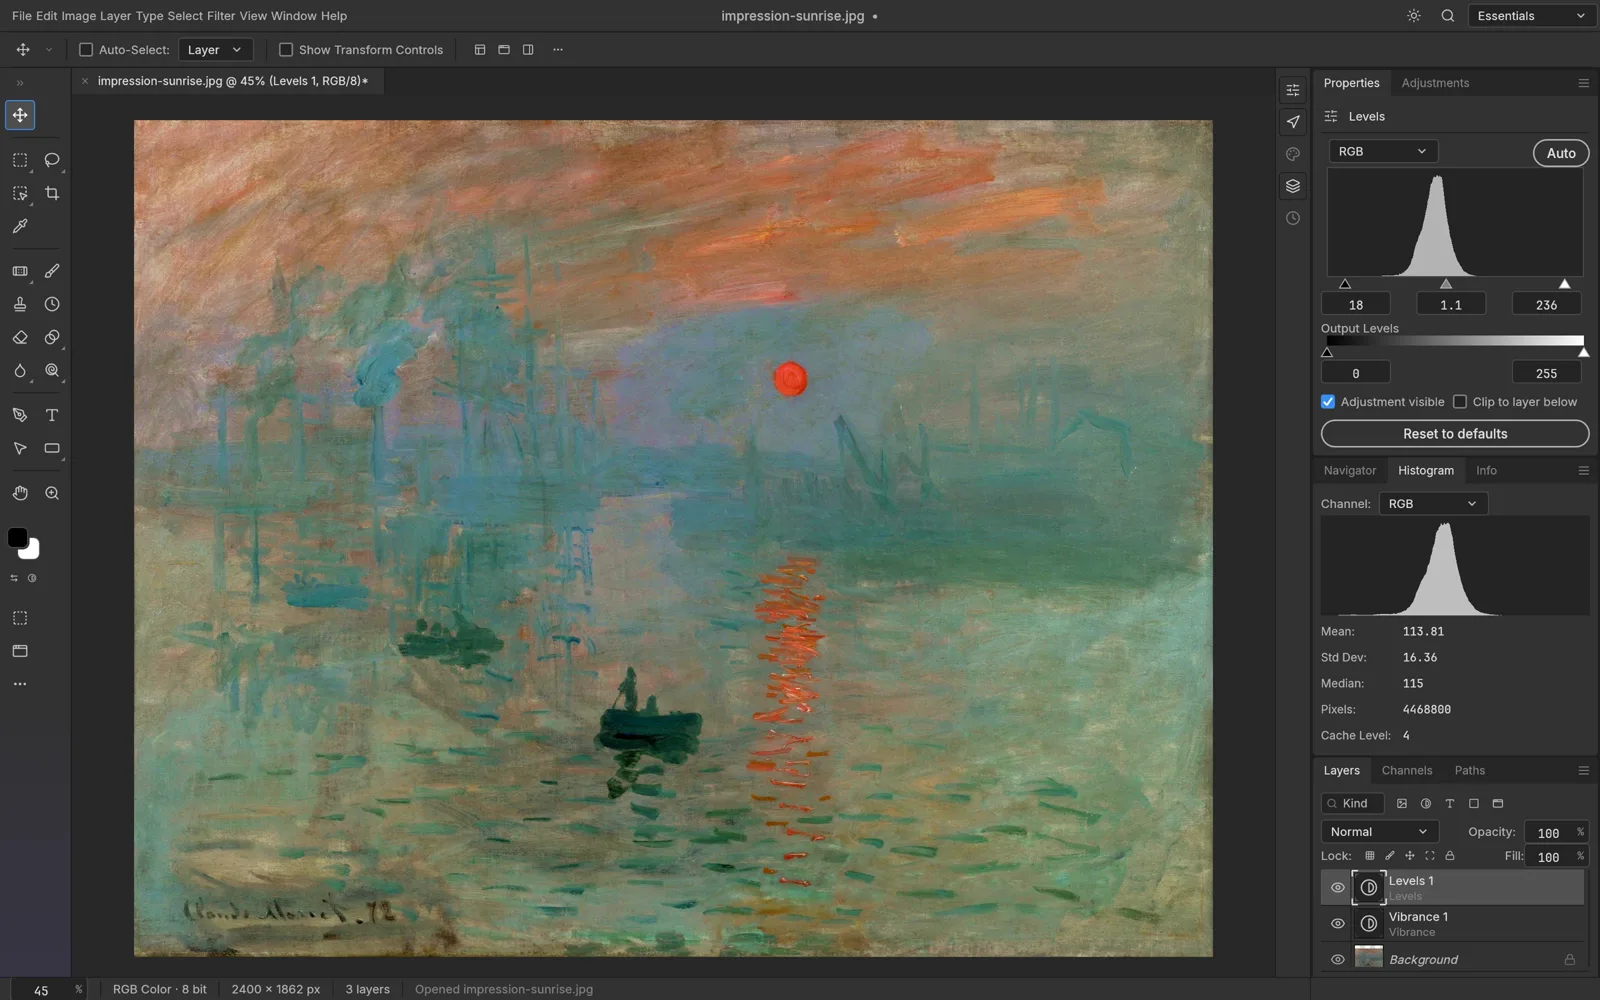
- Adjust tone with adjustment layers. Curves or Levels fix overall contrast without changing the pixels underneath. If a colorized result looks too saturated, a Hue/Saturation layer calms it down.
- Clean up remaining specks. Use the Spot Healing Brush or the Clone Stamp on dust the AI missed.
- Bring back the original where it matters. If the AI changed something important, such as the shape of a face, place your original scan on a layer under the restored version. When the framing lines up, a layer mask lets you reveal the original in just that area.
- Add a caption. Names, a date and a place, added with the Type tool, help the next generation.
- Save and export. Keep a PSD with your layers, and export a JPG or PNG for printing and sharing.
Be honest about what the AI changed
Colorization in particular is interpretation, not documentation.
- Colors are estimates. Unless you supplied them in the notes, nobody knows what color that coat really was.
- AI can invent detail. Sharpened faces can look subtly different from the real person, and lettering on signs or uniforms can come out garbled.
- Keep the original scan. It is the historical record; the restored version is a new image based on it.
- Label what you share. A note such as "restored and colorized with AI" tells relatives and genealogy sites what they're looking at.
- Respect the people in the photo. Only upload photos you have the right to edit, and consider asking living relatives before sharing restored portraits widely. Uploaded photos are processed by our AI model provider to create the result.
FAQ
Is AI photo restoration free?
The restoration tool uses credits for each run because it runs on AI models in the cloud. The cost is shown before you start, and failed runs are refunded automatically. Manual retouching in the online photo editor is free.
What resolution should I scan old photos at?
600 dpi is a good default for standard prints, and smaller prints benefit from a higher setting. Save the master as TIFF or PNG, and upload a JPG, PNG or WebP copy up to 10 MB.
Will the restored faces still look like my relatives?
The model is instructed to keep faces and identity unchanged. Heavily damaged faces may need a second run, so always compare with the original. If a face still looks wrong, use a layer mask in the editor to bring back the original scan in that area.
Can I restore a photo without colorizing it?
Yes. Choose Restore, keep B&W to repair scratches, stains and fading while keeping the original black-and-white or sepia tone.